Did you know that IMPACT Reinforcement can use Annotation scale instead of ltscale for scaling of endmarks and texts?
AutoCAD 2008 introduc
ed a new method to simplify scaling. Annotation scale is meant to replace working with the variables ltscale and psltscale and can be found on the bottom right-hand side of the AutoCAD window. On a layout, when a viewport is selected, a similar control for viewport scales are shown.
The recommended settings when using this feature is msltscale=1, psltscale=1, ltscale=1.
Using these settings will also trigger IMPACT Reinforcement to scale texts, endmarks and distribution line marks accordingly.
Note: When opening a drawing created in AutoCAD 2007 or earlier, msltscale will automatically be set to 0.
The template files that come with the IMPACT Reinforcement installation have been prepared with msltscale=1. If you do not wish to use annotation scale when creating new drawings, we recommend that you create a new copy of desired dwt-file and change msltscale to 0 in that.
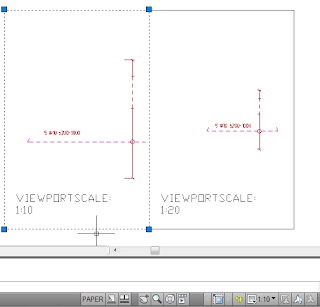
Example:
| 1. | Create a new drawing. Make sure that msltscale=1, ltscale=1 and psltscale=1. Annotation scale will be 1:1 by default. |
| 2. | Draw a bar. Text and endmarks will be very small. |
| 3. | Now toggle the annotation scale in modelspace to 1:10. Texts and marks will be scaled up automatically. |
| 4. | Now change to a layout tab. Create a second copy of the viewport. |
| 5. | Change the viewport scales by selecting the frame of a viewport and toggling the list of scales at the bottom of the screen. Set the first viewport to 1:10 and the second to 1:20. The viewports will automatically zoom to the correct scales. If needed, double-click in the viewport to pan the view so that the reinforcement object is visible. |
| 6. | To initiate scaling of the reinforcement objects, run the Regen All command from the view menu, or type regenall and hit enter. (This is not needed for a plot to be correct). |
| 7. | Now the appearance of the objects will be correct. |